Showing posts with label How To's. Show all posts

Saturday

How To Change App Icons On Android Device

How To Change App Icons On Android Device

How will you feel if you can customise you andriod smartphone the way you want.....awesome right?. Yeah!.
When it comes to changing icons of your apps, things seem to look somehow technical or tricky. 
I believe there might be several reasons why you’d want to change the icons. Maybe you’re bored of looking at the same old icons or sometimes people want certain apps containing private informations to be hidden.
How To Change App Icons On Android & iPhone
Well!, whatever the reason is, it is quite possible to change the app icons using numerous methods like app icon changer, installing launcher or jailbreaking the phone. 
Briefly, i will be discussing two different methods below and the sweet part is that you don’t need to root your phone before you can perform the changes.

How To Change App Icons On Android Device

  • First Method: Installing a Launcher

One of the best launcher I will recommend for at the moment if writing this article is the Nova Launcher you can get it on google play store. 
Nova Launcher is a powerful tool that can be chosen for customizing icons on Android phones.

How To Change App Icons On Android & iPhone

Any launcher that you install will ask you to move ahead with various instructions mentioned within. In case of Nova Launcher, you will be able to make multiple changes like picking an image from your own phone gallery (for the icon), setting up a variety of wallpapers, form the folders or even style out home screen.

Not just this, you will be able to set up dark mode through it and enable smart gestures very easily.

You can also check more Android launchers, learn their mode of operations and choose what better suits your taste?


  • Second Method: Using An App
It's not everyone that actually is comfortable using a launcher on their phone and for them, third-party apps can do the same wonders. Well, you have an option to explore many apps like Icon changer Free, Awesome Icons or Icon Changer.

These user-friendly apps also contain multiple other features apart from changing app icons and provide you with an open source space for experiments on android. Basically, after installing any of these apps, you just need to open it, tap the app icon you wish to replace, and rest will be done through the easy in-built description.

There are some apps which even permit change of the app name along with the icon.

Click the links to download, In case your interested in these apps:

  1. Icon Changer
  2. Icon Changer Free
  3. Awesome Icons


Finally, you can now with ease hide any of your application from friends or kids and let it be safe in the phone without any worry.
medium
How To Transfer Airtime From One Airtel Line To The Other

How To Transfer Airtime From One Airtel Line To The Other

If you're following our post on this blog you should have known how to transfer airtime from a glo line to another .

Today's article is on How To Transfer Airtime From One Airtel Line To The Other.
Airtel network call this Me2u ,just as that of glo is EasyShare.
Watch out for Airtime transfer from Airtel to All Network.

Now, to transfer airtime from one airtel to another airtel line you will need to change your default PIN as set by the service provider to the one you want ( just like that of Glo transfer ).
Transfer or send credit from Airtel to airtel network

To Set PIN :

  • In a message format, send PIN 2345 to  432.

Example : You want your new pin to be 6789, your SMS format will be PIN 6789 to 432.

To Send Airtime :

  • Send an SMS in this format; 2u (phone no.) (Amount) PIN to 432.

Example: You want to send 500naira to the number (08084076066).
You will do it this way - 2u 08084076066 500 6789  (send the SMS) to 432.
....and that is all.

Watch out for Airtime transfer for 9mobile and Mtn network..

Kindly help us to share this post. Kudos!

Thursday

[Solution] USB Malfunctioning Or Flash Drive Not Recognized On Windows Computer

[Solution] USB Malfunctioning Or Flash Drive Not Recognized On Windows Computer

How To Fix USB Malfunctioning Or Flash Drive Not Recognized In Windows Computer.
Flash-Drive-not-recognized-or-supported

USB is an acronym for Universal Serial Bus. 
A USB is a commonly used hardware that serves as an interface for attaching peripherals to a computer.

What are peripherals ?

  • Peripherals are devices that are outside the computer's system unit. Examples a printer, scanner, keyboard, mouse, camera, hard drive, USB cable, modem, flash drive etc.

All theses peripherals are attached to a computer system via a USB port.

A USB hub is used to provide more connection spaces to a computer.


A computer system has at least two two USB ports.

USB malfunction or not recognized can occur on all Windows operating systems.

USB error or malfunction had for long been an issue that computer users face or experience when they are trying to connect to an external drive or device.

Many of us had in one time or the other experienced or still experiencing what we are discussing here today.
And might have created fear in you that your computer is damaged just because you're unable to perfectly connect your phone or any external device to a computer.


Also Read : How To Fix Missing .DLL Files On Windows Computer Right Away

Possible Causes Malfunctioning Or USB Not Recognized problem On Computers And Their Solution 

Here, I will be stating all the causes of that error "drive not recognized" and below each of the problems will be their solutions respectively. Okay, let's go.


1. Usb Port Not Working Properly :
If the USB port or connector is dirty or damaged definitely, it will not  display any peripheral connected to the computer.

Confirmation : 

  • To be sure if it's really the USB port  that's not working, remove(unplug) that flash drive and connect it to another port on the same computer. Not still recognized by the computer ?. Connect to another computer, if recognized then it means your own port has a problem.

Solution :

  • Switch off the computer. Take a small portion of Cotton wool, soak into methylated spirit. Use it the gently to clean the usb ports. Wait for 7mins for it in dry up. Switch on the Pc and connect your flash drive again. If it work...good job!. And if it didn't then you will have to take the Pc to the engineer. Or you will consider getting a new one.


2. Too Many Usb Devices On The Same Computer :
A times it is due to the heavy load of peripherals connected to the PC which might in turn stop other devices from working properly.

Solution :
  • Unplug all devices. Now, plug only one to the PC. Not working ?. Proceed to the next step.

Also Read : Top Best Duplicate File Finder And Remover Software For Windows


3. Outdated Driver : 
Your usb driver is outdated and you're expect to work?, oh no!.

Solution :

  • Use Windows update to check if you need a new driver for your device.
Install update package. This will automatically diagnose and repair all USB problems on windows 7 to 10.
  • Click on => Download Now . Run the file and follow the steps in the Windows USB Troubleshooter.
  • If you're not on the computer having the problem kindly download this file and save on a CD then use it from there.


4. Unstable or corrupted USB controllers :
This method will help to fix a corrupted or unstable USB controllers by reinstalling the controllers.

Solution :

  • Goto "START" menu on your computer search "DEVICE MANAGER" .click on "Device Manager".
  • Click + sign to expand "Universal Serial Bus controllers". Press and hold (or right-click) a device and select Uninstall. So, repeat for each device.
  • Once you're through with all, restart your the computer. 
  • Now, your USB controllers will be installed automatically. Test to see if it's now working.
Note : If the problem persist proceed to the next step.


5. Change the USB Selective Suspend Settings :

Solution : 

  • Goto control panel and click on " power options " 
  • Click on " Change plan settings".

  • Click on " Change advanced power settings ".

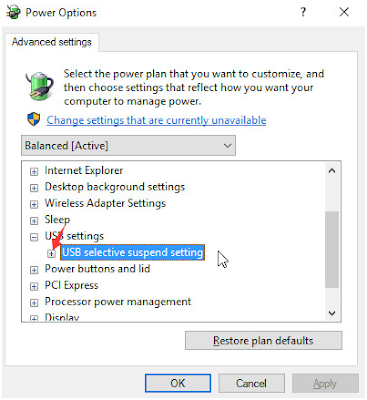
  • Expand USB settings and USB selective suspend settings.

  • Disable both On battery and Plugged in settings.

  • Click on "Apply " and the " OK ".

Not still working ?, try the next solution.


6. Repair USB Root Hub :


Solution :  

  • Once again, open Device Manager . click + sign to expand Universal Serial Bus controllers.
  • Right-click " USB Root Hub " option and click " Properties ".

  • Go to " Power Management " tab and untick the " Allow the computer to turn off this device to save power ". Click OK.

  • If you have more USB Root Hubs, you need to repeat this operation a couple of times. And always remember to click " OK " after each performance.

  • After the settings, connect your USB device back and test if the computer can now recognize it.


  • If your USB device is not still working fooni through this. Check(tick) the " Allow the computer to turn off this device to save power " back on...

7. Hard Reset On Desktop Computer
Solution : 
This works with desktop.

Solution : 

  • Unplug and plug your power cable from the CPU (central processing unit).
  • Plug it back. It will hard reset your CPU and in turn make you computer's software to recognize the hardware which is the flash drive.


8.  Your Computer Motherboard is Outdated :
This is the last method I'm giving out because this is the last resort of others fail.

Solution :

  • Install your motherboard's latest chipset drivers so that your drives will be recognized.
  • Checkout your computer's documentation which will contain the exact name of the motherboard manufacturer.Then,
  • After that, kindly visit your computer manufacturer's support website. There you will be privileged to access the list of computer manufacturers' support sites. Just like the list of computer manufacturers here.
  • Navigate their website to find the appropriate drivers for your motherboard. For assistance, contact your computer manufacturer.

Also Read : Prolong Your Laptop's battery Life With These Simple Tricks.


You've been able to learn all the methods on how to fix usb malfunction or flash drive not recognized problem on windows Computer do well to share this post to your social media timelines.

If you have any question don't hesitate to type in below comment box. 
Enter you email below to subscriber to daily hot techs solutions and tips like this.

Tuesday

How To Transfer Airtime From One Glo Line To Another,

How To Transfer Airtime From One Glo Line To Another,

On globacom network, you can transfer or send credit or airtime from from one line to the other, which is known as Glo EasyShare.
To transfer airtime on glo (i.e glo to glo number) you will first of all need to set a password that you will be using the transactions. After which you can now transfer the airtime.

People do ask of how to transfer credit from glo to another network e.g Glo to mtn. Just be updated on this blog.

How to transfer Glo airtime from one line to another
To get this done kindly follow my steps below.

How To Transfer Airtime From One Glo Line ( Glo network ) To Another:


Step 1 : 

  • The default password for airtime transfer on Glo network is 00000 . 
  •  Dial this code : *132*00000*New Pin*New pin#.
» Replace New pin with the pin you wish to be using.
» For example; I want to use 23456 as my pin, I'll do it this way *132*00000*23456*23456#

Now that you've changed your password let's move on to the second step.

Step 2 : 

  • To transfer airtime you will Dail *131*Phone number*Amount*Pin# .

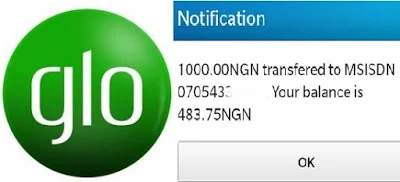
  • You will receive a confirmation message likewise the person you sent airtime.. if the transaction is successful.

Do well to share this post using the social media buttons below.

And don't forget to send airtime to the admin of this great site you can dial this code *131*07050565443*Amount*PIN# . Thanks in advance!!!.

Friday

How To Activate Glo Night And Weekend Browsing Data

How To Activate Glo Night And Weekend Browsing Data

You are here on this page because you wanna know how to activate night browsing data and weekend browsing data on glo network.
Just like 9mobile night data subscription glo also have its own set of plans you can activate for night browsing. It seems the night browsing plan for glo is cheaper than that of 9mobile.
How to Activate Glo night and weekend data subscription

After reading through this post you will be able to decide which one to do.
Data from Dent App

How To Activate Glo Night-only Browsing Data


  • The first version of the night browsing will grant you 1Gb worth of data for just 200 .

  • It has a validity period of just one night that is, browsing starts from 12am to 5am.

  • Whether you exhaust the data or not you can't use it the next night.

  • To Activate this dial : *127*60# , alternatively you can  send an sms : 60 to 127. 200naira will be deducted and you will be given 1gb which you can start using from 12am - 5am that same day.


How To Activate Glo TGIF Weekend Plan


  • This is a weekend plan that will only cost you 500 and in turn you'll be given 3GB worth of data.

  • Data can only be used during the weekend (from Saturday 12 am – Sunday 11.59pm).

  • To Activate this package dial : *127*61# . Alternatively, you can use SMS format; send 61 to 127. And it will be activated to be used at weekend.

  • Validity period is 1week( 7days).

Don't just read this post share it as well and leave a comment below. Thanks.