Friday

Complete Guide On How To Migrate Your Blog From Blogger To WordPress

Complete Guide On How To Migrate Your Blog From Blogger To WordPress


Am bringing to you today a complete guide on how you can move your blog from Blogger blogspot  to WordPress without losing any traffic and SEO.
Before we commence the migration , here are the list of our goals:
     (1)  Retaining traffic and your google page rank.
     (2)To import all posts, comments and pages to WordPress.
     (3)Retaining all feed subscribers, posts Facebook likes and Tweets.
   (4)  Maintaining permalinks for posts & pages i.e. 1-on-1 mapping between Blogger.com and WordPress pages.
Now that our goals are clearly , the next thing is to understand the differences between having a Blogger.com blog on a subdomain and on a custom-domain;

See the two different cases here:

(1) Blog with a subdomain address – e.g. http://yoursite.blogspot.com
(2) Blog with a custom domain address – e.g. http://yoursite.com
If your blog is using a subdomain address, it might be a bit difficult achieving all the four goals set above. So for the subdomain case, the best solution is to – setup custom domain on Blogger.com to be able to achieve all the goals.

Now let us start migration… at this point, I believe you have:
     >>  Your blog on Blogger has a custom domain address.
     >>  You have a webhosting where you can install WordPress.
     >>  Finally, you can access your domain’s DNS records.
     Blogger to WordPress Migration Begins
1. First, Set your DNS entries to point to your hosting account and Install WordPress. You can easily install WordPress by making use of the auto installer on your cPanel. Login to your cPanel and locate WordPress one-click installer provided by your web host.
2. Enter WordPress Dashboard, go to Settings -> Permalinks and select Custom Structure option and paste the following value next to it and save changes.
/%year%/%monthnum%/%postname%.html
Note: The aim of doing this is to make your WordPress blog’s permalink structure have the same looks as Blogger.

3. Now we want to import all your Blogger posts to WordPress. To achieve this, go to Tools > Import options and select Blogger options. A pop-up box will appear, click on Install Plugin to install the importer plugin in WordPress

4. Just click on Activate Plugin & Run Importer. You will be asked to grant access to your google account. Click on Grant Access and you may be prompted to login to your google account if you’re not already signed in.

5. After you granting it access, you will be lead back to Blogger importer on WordPress. So if you have more than one blog on your Blogger account, you will see all of them listed here. Just click on the import button next to the blog that you want to import into WordPress.
6. Once you click import, all posts and comments from Blogger.com blog start importing into WordPress. Importer may stop in between. In that case, the text on the button will change from Import to Continue just keep clicking on it, until the button-text changes to Set Authors, which indicates all posts and comments have been imported successfully.
I want you to note that WordPress Importer does not import the pages from your Blogger.com blog, soyou have to do this manually.
At this point, your Blogger.com blog is completely imported. But wait, your images hosted on Blogger’s server are still on there so do not delete your Blogger.com blog.
Fixing Permalinks
In step 2 above, I mentioned that the WordPress permalinks should be configured to look like Blogger permalinks. Now, we need to make both look identical to keep traffic, SEO and achieve our goals.
Look at the WordPress post link below:
http://www.damytechs.com/2016/09/welcome-to-wordpress-this-is-your-first-post-edit-or-delete-it-then-start-blogging.html
And the following blogger.com post link for the same post:
http://www.damytechs.com/2016/09/welcome-to-wordpress-this-is-your-first.html
Both permalinks have the same structure but the slug is different and we must make it look exactly like it was on blogger in order to make search traffic point to that very blog post inorder to avoid your visitors getting Error 404 (Not Found).
Copy the code below to a notepador or any wordeditor and save it as blogger.php
<?phprequire_once('wp-load.php');$res = $wpdb->get_results("SELECT post_id, meta_value FROM $wpdb->postmeta WHERE meta_key = 'blogger_permalink'");$wpdb->print_error();foreach ($res as $row){$slug = explode("/",$row->meta_value);$slug = explode(".",$slug[3]);$wpdb->query("UPDATE $wpdb->posts SET post_name ='" . $slug[0] . "' WHERE ID = $row->post_id");$wpdb->print_error();}echo "DONE";?>
Now upload this to your public_html or the folder in which your wordpress blog is installed., and run the script like this: http://your-blog.com/blogger.php
On running this script, the only output you must see is “DONE”. At this point, check the post links on your WordPress blog. Their path part must now be identical to Blogger.com post link…ok!!
Moving Your Blogger Feed Subscribers Over To WordPress
 If you are using Feedburner, update source feed URL as it will be changed during the migration. Just use the .htaccess hack below to fix URL of your feed.
Now add following lines at the top of your .htaccess file which can be found in root directory of your WordPress installation.
#ATOM FeedsRewriteRule atom.xml feed/atom/ [L,R=301]RewriteRule feeds/posts/default feed/atom/ [L,R=301]#RSS FEEDSRewriteRule feeds/posts/default?alt=rss feed/ [L,R=301]RewriteRule rss.xml feed/ [L,R=301]#Comments FeedRewriteRule /feeds/comments/default  comments/feed/  [L,R=301]RewriteRule /feeds/comments/default?alt=rss comments/feed/  [L,R=301]
OR You can simply add new WordPress feed URL, inside blogger dashboard -> Settings -> Site Feed under Post Feed Redirect URL and then click on Save Settings.
Handling Your Blogger labels/archive pages
After you are done with the whole installation, your blogger labels/archive pages will be  automatically redirected to your WordPress 404 page. To avoid this, add the following code into the .htaccess file:
#Redirect archivesRewriteRule ^([0-9]{4})_([0-9]{1,2})_([0-9]{1,2})_archive.html$ $1/$2/ [L,R=301]#Redirect labels/categoriesRewriteRule ^search/label/(.*)$ category/$1/ [L,R=301]
Removing Your Old blogspot Site from Google Index
Like I told you earlier that you should never delete your Blogger blog because your images are still hosted on blogger. Now, in other to avoid duplicate contents and google penalty, you must remove your blogspot site from google index by pasting the code below in the head section of your blog.
<meta content='NOINDEX, NOFOLLOW' name='ROBOTS'/>
And that is all!!!!!!!!!!.....

You can get huge traffic from the site  by CLICKING HERE
PLEASE MAKE SURE YOU FOLLOW EACH STEP CAREFULLY AS ANY MISTAKE MADE WILL NOT YIELD TO YOU YOUR EXPECTED RESULTS!!

LEAVE YOUR COMMENTS BELOW AND REMEMBER THAT SHARING IS CARING……..SO DO WELL BY USING OUR SHARE BOTTONS BELLOW.THANKS!!!!

Tuesday

How To Transfer Bulky Files Between Windows, Andriod And iOS Without Flash Drive Or SDcard

How To Transfer Bulky Files Between Windows, Andriod And iOS Without Flash Drive Or SDcard


Though this not new but not all persons actually have the knowledge of what am gonna share with you guys today which is how you can with ease transfer a very large/bulky file between windows, android and ios without using USB drive, CD-ROM or SD Card and at optimum speed.

So am happy to inform you that there is an app that will enhance you to send files which ranges from 1mb to 100gb just in seconds without you in need of any cable, drive etc for connections.
The app i will recommend for now is called “SHAREit” – from its name you should know what the app is meant for ; which is basically for “sharing” ! SHAREit is an application from Lenovo, it allows sharing or transferring of files and folders among tablets, smartphones and Pc’s.

It works on all windows, andriod and apple devices. You can use it to transfer files either from Pc-to-smartphone, smartphone-to-pc or Pc-to-Pc…… so any how you want to make use of it , it’s very easy to operate. All you need to do is to turn on your wifi on both the sending and receiving devices.

 By using this app you enjoy the following features:

  •  The size of file you can share has no limit, only that files large files will take longer time than short ones.
  • The speed of sharing is very fast, about 40 times faster than Bluetooth.
  •  Files can be shared from Andriod phone to Windows tablet, from a Windows notebook to and so on like that.
  •  You can send almost any type of file including photos, documents, music, vidoes, and apps.
  • Finally, it has the ability to share a whole folder at a time.
 Now that you have seen all the features of the app you can now download SHAREit app for you respective Operating Systems;
>> For PC users download the software here.
>> Andriod users download it from googleplay using this link  .
>> For iOS users get it on App store through this link.
>> For windows users download yours from here.

 How To Use The App (E.g Transfer Of Files From Andriod To PC).

 After successful download of this app kindly install it and open it. So after opening it you will see two options to choose which is “SEND” and “RECEIVE” , you will click on “SEND” on your android phone and lick on “RECEIVE” on your PC then you will turn on your wifi on your PC and that is all you need!!!!!!!

 I hope you’ve gained allot from this article so do well in sharing the post to others by clicking the Share Buttons below …..drop all you comments and also subscribe to our latest posts which is absolutely free by entering your Email in the form below ……………..

 Have A Beautiful Day Ahead!!!

Wednesday

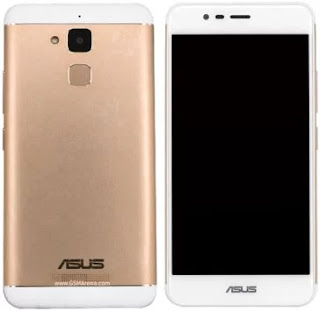
Specs. And Price Of Asus ZenFone Pegasus 3, with 4100mAh Battery.

Specs. And Price Of Asus ZenFone Pegasus 3, with 4100mAh Battery.

This phone has some simiarities of some cool phones that had being in existence before, if you look atTecno X521 and Tecno Camon C9 you will noticed that they both have fingerprint reader at the back of the phone so also is this "Asus ZenFone Pegasus 3" also and one of the things that made me love this phone is the battery capacity which is 4,100mAh ,not only that, the phone comes with 4g which makes it a perfect for ntel Nigeria network.

Other specifications which includes the Camera, which is 13.0mp(back camera) and front camera which is 5.0mp. 

See the full specifications and the price below:


Display: 5.2 inch 1080 x 720 pixels HD 2.5D Arc screen

CPU: MTK6737 Quad Core 1.3GHz
System: Android 6.0

RAM + ROM: 2GB/3GB RAM +
16GB/32 ROM

Max Storage Expansion: 64GB

Camera: Dual back camera 13.0MP + front
camera 5.0MP

Bluetooth: 4.0

Feature: Fingerprint scanner, Gravity sensor, Light sensor, Proximity sensor

SIM Card: Dual SIM dual standby (one is Nano SIM card, the other is micro SIM card)

Network:
2G: GSM 900/1800/1900MHz
3G: WCDMA 850/900/1900/2100MHz
4G: FDD-LTE 1800/2100/2600MHz.

Battery : 4100mAh

Price : $182 (About N54,000)

You can buy on Konga HERE  @30,000

Saturday

How To Add Social Content Locker To Blog post In Blogger

How To Add Social Content Locker To Blog post In Blogger


I am introducing to you today how you can lock any content be it text, video, URL, image etc in your blog post with any social icon.For now i’m using three important social networks which are Facebook, Twitter  and Google plus.

There consists of so many series of social content locker available.
The basis of this plugin consists of Jquery and the main function of this plugin is content locking with different social buttons.

All  bloggers want a lot of views to their published post, so, they always tell their readers to always "share" after reading right? ..but that fact is that not all that will do that...only few people will take their time to share/like a post they read. Now, to force them to get your post shared/liked ,what you will do is to put what is called a "Social Content Locker" in an important part of the article so that when they read the article to that point, they will see something such as; "This content is locked, click any share/like botton to view all post" . If truly your article is very interesting to them ..they will click on the botton. In-other words, you increase traffics to your blog.

Now let us go into the practical part straight-way, follow me carefully:

STEP 1 : 
  •  Goto your Blogger dashboard.
  • Click on template >> click on Edit HTML.
STEP 2 : 
  • Click any part of the code box and search for </head> using Ctrl + F.
  • After searching,paste the below jquery just above </head> .
<script src=’http://code.jquery.com/jquery-1.10.2.min.js’ type=’text/javascript’/>
NB : If you found this same code there, no need of putting it again.

STEP 3 :
  • Now you will copy the code below and paste it below </head> you've searched for previously.
<link href=’https://googledrive.com/host/0B_1mqJd2tC8qeDVzSnBJMDh5WUk’ rel=’stylesheet’/>
<script src=’https://googledrive.com/host/0B_1mqJd2tC8qbGdmQzRZVGk3bXM’ type=’text/javascript’/>
<script type=’text/javascript’>
//<![CDATA[
jQuery(document).ready(function ($) {
$(‘#default-usage .to-lock’).sociallocker({
buttons: {order:[“facebook-like“,”twitter-tweet“,”google-plus“]},
twitter: {url:”http://twitter.com/damytechs“},
facebook: {url:”https://www.facebook.com/damytechs“},
google: {url:”https://plus.google.com“},
text: {
header: “Like us To Unlock This Content“,
message: “This content is locked. Like us on Facebook, Twitter or Google plus to unlock it.
},
locker: {close: false, timer: 0,},
theme: “dandyish
});
});
//]]>
</script>
Note :You should change the highlighted Url,s with your own links.

HOW IT WORKS: 

  • When you are done with adding and replacing values for all codes above. Now, to add social locker in your blog post, just copy and paste them into the HTML tab of that particular post.

  • Replace -ADD YOUR TEXT HERE- with your video, text or image you want to lock.
  •  Finally publish your post and see it working.
HOPE IT HELPED A LOT, THEN DONT FORGET TO SHARE & DROP YOUR COMMENTS!!!!!

Wednesday

How To Embed Facebook Videos In Blog Post

How To Embed Facebook Videos In Blog Post


Allot of vloggers want to broadcast their videos either on Dailymotion, Youtube, or Facebook to make it popular in order to get millions of views and also earn from it.
 Apart from being able to embed your  facebook video directly from your youtube channel, their is a reason why you should embed your facebook videos on your blog.

The reason is that, it's not only views youwill get to your videos but you will also get facebook likes.So, in other words, it is beneficial to your "facebook page" and your "youtube channel".

And also , if you wish to show videos on the Header, Footer or Sidebar of your blog you should use the same code in layout.
So, to get this done just follow my simple steps as i have shown it below :

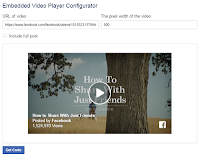
  • FIRST STEP:  Visit this page Facebook Video Embed. After the page opens, use your video url to replace [https://www.facebook.com/facebook/videos.....] . 

  • SECOND STEP:  Beside/under the video url, set the width of the video.
Note : If you wish to include full post along with video, just click "Include Post" checkbox.

  • THIRD STEP: Tap on "Get Code" botton. After doing that, the new page that pop-up gives two options of codes which are: Javascript SDK and the video code, so you should add a simple <iframe> code instead of Javascript SDK.Therefore switch to iframe. Now, copy the code you are given.
  •  FORTH STEP: Goto the post where you want to put the video > switch to "HTML" Post Editor.
  •   FINAL STEP: Publish your post and see it worked!!!.
If you followed me carefully as explained above, i belive with the five simple steps ,your videos are now embedded in/under your post. You should now start getting a lot of views and likes.
If you love this Article then drop your commnts, share and let others see it.
Alwasys check back for our lates udates and subscribe to recieve via email.

Happy Blogging and Vlogging!.

Monday

Pictar: Turning Your iPhone Into A Professional Camera

Pictar: Turning Your iPhone Into A Professional Camera


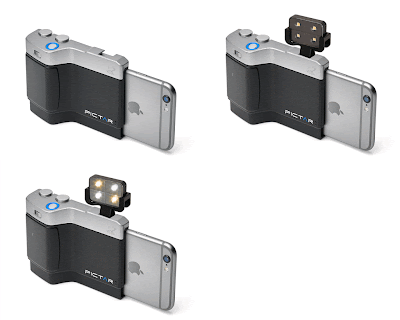
Pictar is a device made to give a comfortable and stable grip to the iPhone when using the camera.

Nowaday people love and uses the iPhone ,it has become so many person's first choice in terms of it camera.

so,With this picTar camera grip helps to grip or hold tight the iPhone which gives the user a comfortable means to have a nice camera shot, not only that, it also makes holding the iPhone more stable.

The interesting feature about this device is that:

(i)  It is easy to use.

(ii)  It is made with bottons by one side(upper part) of it ,and these bottons works very great with the iPhone which makes the phone operate just like a real or proffesional camera.

(iii)  Pictar does not consume much battery ,you can use it over and over for long periods of time.

For now you can check it on Kickstarter as time goes on it will be shippable.

Wednesday

All What You Need To Know About Android Instant App(Updated).

All What You Need To Know About Android Instant App(Updated).

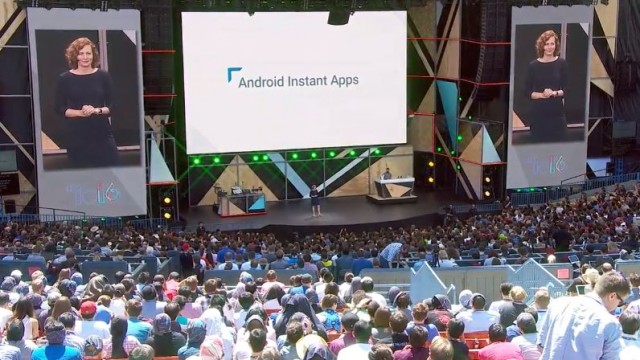
A world wide giant technology company,Google, announced recently during the I/O developer conference their plan to bring up what is know as Android Instant App.


Actually, the introduction of Instant Apps for andriod devices was just to link up(I mean to bridge the gap between) web apps and native apps.

See this: Now You Can Test-run Apps On Google Play Before Downloading On Your Phone - Check It Out

Idea Behind Instant Apps.

The idea behind Instant Apps is that they break native Apps(store Apps) into small part now, after breaking the app into a small part it makes the app very small which will be able to run almost instantly without installing the App on your device. 


Also Read: Get Avast Antivirus With 1 Year License Product Key For Free


Now, let me tell you how it works.


How Does Instant Apps Works ?

Instant Apps opens so fast just like web apps but still function in a similar way as the native Apps.


The Android Instant Apps are like a test version of the real native App, in that when a user clicks on the deep link associated to the Instant App they are redirected to a small app version of a mobile web page, and there the user is able to make use of all the app features even without downloading or installing the app.

So, what do you have to say about the newly added feature. Please we love to see your comments!.
Thanks.

Monday

Add ReadMore Attribution Link To Each copied Text In Blogger

Add ReadMore Attribution Link To Each copied Text In Blogger


The internet is made available for everyone to access and share informations and ideals thereby making communication very easy .

Bloggers are increasing daily on the web definately the lazy ones are out there to copy your articles you've spent allot of time in writting to their own website ,the annoying side of it is that you'll hardly see anyone that will credit the owner by creating a link back to that post.

Am gonna teach you today how you can automatically make any copied text from any of your blog post have a link point back to your blog.

You can easily get this done by following the few steps below :

Step 1:

  • Click on Template and also Edit HTML.


Step 2:

Make sure you are using a pc to do this.

  • Click any area in the box that appears..
  • Now search for </head> by using Ctrl + F. on ur keyboard .

Step 3:


  • Copy the script below and paste immediately above or before the </head> tag.
<script type="text/javascript">
function addLink() {
 var body_element = document.getElementsByTagName('body')[0];
 var selection;
 selection = window.getSelection();
 var pagelink = "<br /><br /> Read more at: <a href='"+document.location.href+"'>"+document.location.href+"</a><br />Copyright &amp;copy; Damytechs"; // change this if you want
 var copytext = selection + pagelink;
 var newdiv = document.createElement('div');
 newdiv.style.position='absolute';
 newdiv.style.left='-99999px';
 body_element.appendChild(newdiv);
 newdiv.innerHTML = copytext;
 selection.selectAllChildren(newdiv);
 window.setTimeout(function() {
  body_element.removeChild(newdiv);
 },0);
}
document.oncopy = addLink;
</script>

Click on save template and that's allll...

By doing these,you have successfully added a ReadMore attribution link To any copied text on ur blog.
And also, these will generate so much traffic to your blog.

TO TEST : Try copying anything on ur blog and see it works!!!!!!

Do you have any question or complaint drop your comment below.


GET AN AWESOME TRAFFIC TO YOUR SITE NOW FrOM MAXVIST CLICK HERE NOW!!!

Sunday

Best Antivirus For Andriod Devices

Best Antivirus For Andriod Devices


Andriods are always disturbed by malware , meaning that android devices {be it tablets/smartphones}are very prone to attacks from Adware, Rootkits, Malware, Spams and so on.
Its not good enough you are using a smartphone or tablet without having a strong antivirus to protect and secure it from any form of threat.

Some of these virus makes your android device to misbehave , e.g Auto-reboot, On/off, contacts hiding or deletion, file corruption to mention but a few, when you notice any of these things then your driod is on danger.
So, I have listed out some selected antivirus apps which will be of great help to you ,most of which I have once used before and still using it till date.

 Some of these apps are free to use while others need to be paid for after exhausting their trial periods.
Click the “Download From Google Play” link to download anyone of your wish.

1. AVG ANTIVIRUS :
Features :
Malware Protection, Av real-time Scanner, Backup assistant, task killer etc.


2. AVAST MOBILE SECURITY:
Features :
Malware scanner, privacy report, sheild control, UI, firewall and many more.


3. McAfee ANTIVIRUS :
This app is part of the ones i talked about above , comez with free trial...Its give 1month free trial after exhausting dat then u'll need to pay.

Features :
 Protection against malware, theft, apps block, backup, apps locks etc.


4. KAPERSKY MOBILE SECURITY:
A very popular app commonly used on pc,java & Andriod.I ranked it as 4th cuz its lite version doesnt have so much features to enjoy...So, to get many other features u'll upgrade to premium.With premium version u'll enjoy the following features:
 protections against malware, spams, unwanted call, quick detection, adware, privacy protection, call and sms filtering etc.


5.  LOOKOUT MOBILE SECURITY:
It provide security for both private and public devices


Dont be selfish share this post to others by clicking the share bottons below...


Which antivirus are you using?, tell us by using the comment box below...Oyaa...

Thursday

Airtime Recharge Codes For All Banks In Nigeria

Airtime Recharge Codes For All Banks In Nigeria


Have you ever been in need of credit before either to make a call or for subscription and you don’t have any cash at hand or sometimes you might want to make an urgent call at night when all shops around your area have closed or far away from ur abode and there might be no bank around ur home to do a transfer,
So today I bring to you the simple USSD codes you can use to recharge your line for all the banks we have in Nigeria. I’ve also been using some of this codes for long  and it helps …. With these codes you can easily recharge your line without any stress
Make sure you write them out correctly because If you dail a different code from the ones have short-listed below you may get an error message!.

SEE THEM BELOW:


First Bank Recharge Code
For FirstBank account holders, you can top-up your mobile lines directly and instantly by dialing *894*amount#
E.g. *894*100#
N.B :  Daily Limit is ₦3,000 Naira

Sterling Bank Recharge Code
With “Go Recharge,” tap your way to seamless, stress-free airtime top-up. Just dial *822*Amount#
E.g. *822*100#

Skye Bank Recharge Code
For Skye Bank, dial and send the following code *389*076*1*Amount#
 For example if you need N200 airtime:
E.g. *389*076*1*200#

United Bank for Africa (UBA) Recharge Code
For UBA customers, to recharge your phone with any amount of airtime dial *389*033*1* Amount#
*389*033*1*100#

EcoBank Recharge Code
For Ecobank customers, to recharge your phone dial *326*Amount#
For example you want to recharege ₦600 dail *326*600#

Guaranty Trust Bank (GTB) Recharge Code
For quick self-recharge, dial *737*amount# and SEND from your mobile phone (This must be the from the mobile number registered in your account). E.g. *737*1000#
To recharge for other numbers, dial *737*Phone no*Amount#. E.g. *737*08055500555*1000# N.B :  Note you will have to verify the transfer by entering the last four digits of your ATM card)
Daily Limit is ₦5,000 Naira.
 
Fidelity Bank Recharge Code
For self-recharge, dial “*770*amount# and SEND from your mobile phone (This is accessible using all types of mobile devices). E.g. *770*1000#
To recharge for family and friends, dial *770*Phone no*Amount#. E.g. *770*08023456789*1000#.
N.B : Daily Limit is ₦5,000 Naira

Zenith Bank Recharge Code
For Zenith Bank customers Simply dial *302*Amount# and Send from your mobile phone
Eg: For ₦100  dail *302*100#
N.B : Daily Limit is ₦5,000 Naira

Stanbic Bank Recharge Code
For Stanbic Bank customers Simply dial *909*Amount# and Send from your mobile phone
Eg: For ₦1000 dail *909*1000#
N.B : Daily Limit is ₦5,000 Naira

Access Bank Bank Recharge Code
For Access Bank customers Simply dial *901*Amount# and Send from your mobile phone
Eg: For ₦750 dail *901*750#
N.B : Daily Limit is ₦5,000 Naira.

First City Monument Bank (FCMB) Recharge Code
For FCMB customers Simply dial *322*214*amount# and send from your mobile phone
E.g: For ₦1000 dail *322*214*1000#

Wema Bank Recharge Code
For Wema Bank customers Simply dial *322*035*amount# and send from your mobile phone
E.g: For  ₦1000 dail *322*035*1000#

Diamond Bank USSD Recharge Code
For Diamond Bank customers simply Dial *302*amount #
E.g: To recharge ₦1,000 dial *302*1000#
For Diamond Yello Account holders Dial *710*555*Phone no*Amount*PIN#

Unity Bank USSD Recharge Code
For Unity Bank customers dial *322*215*amount# to recharge.
E.g: To recharge ₦1,000 dial
*322*215*1000#

Heritage Bank USSD Recharge Code
For Heritage Bank customers, dial *322*030*Amount#.
Eg: To Recharge ₦300 simply dial
*322*030*300#

KeyStone Bank USSD Recharge Code:
For KeyStone Bank customers, dial *322*082*Amount#.
Eg: To top up your line with N400 dial
*322*082*400# .
N.B : The minimum is N100 while the maximum is N3,000.

Union Bank USSD Recharge Code:
For Union Bank, the USSD code for Union Bank is *389*032*amount#.
E.g To recharge your mobile phone with N600 dial *389*032*600#

Make sure you drop ur comments ,and if i have omitted any one , kindly notify me by using the comment box below so I can include it in the list...
DON’T FORGET TO HIT THE SHARE BOTTONS BELOW!