Thursday

How To Connect Two Laptops Using LAN Cable In Windows

How To Connect Two Laptops Using LAN Cable In Windows


The full meaning of LAN is "Local Area Network".
As a result of the rapid rate of technological upgrade; the use of computers and Laptops for our daily activities has largely increased. Recently the use of Laptop has increased because Laptops are portable and compact and provide many facilities and opportunities just in a single unit. Laptops are useful for office works as well as home activities. With the help of Laptops we can do our work where ever we like.

 It’s nowadays common that laptops has storage space of 500 GB or 1 TB .
Most a times, we use pendrive to transfer files/data from one device to another, just like we want to transfer whole data from one laptop to another.

So, to transfer data at higher speed  we can use a crossover LAN cable with RJ-45 connector to connect two laptops. It can transfer data with more than 200 MB per second. Even we recommend to use cloud storage services so we can easily access common data from any device.

Now, am going to explain to you how you can easily connect two laptops using LAN cable. Just in ten steps, there we go!!!.

Step 1. Connect the both laptops using crossover LAN cable with RJ-45 connector; simply by connecting one end of the cable to the first computer and the other end to the second computer.

Step 2. open the control panel and choose network and sharing center.

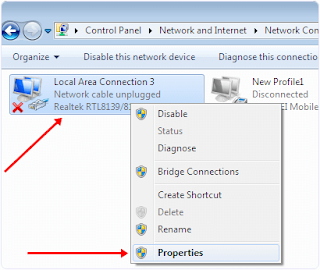
Step 3. Click on  “change adapter setting” option. After clicking the change adapter setting you will see a pop-up window.

Step 4. You will see  Lan adapters(on the pop-up page). Right click on “properly installed adapter” then, select its “properties”.
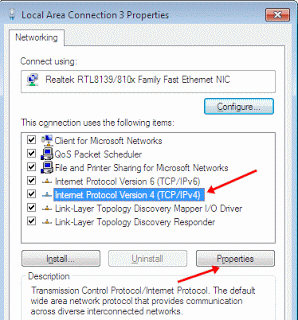
Step 5. In the properties sub-menu click on the “Internet protocol version 4”, then click on the “properties” button.

Step 6. Now enter IP addresses in both the laptops accordingly as given below:

Settings In First Computer Or Laptop:
IP address: 192.168.0.1
Subnet mask: 255.255.255.0
Settings In Second computer Or Laptop:
IP address: 192.168.0.2
Subnet mask: 255.255.255.0 

Step 7. After Entering IP addresses restart your laptops and open the Network tab by entering network in the Windows Start menu.

Step 8. In Network tab you will see the list of all connected computer to the same network. After computers are successfully connected now you have to share drives to transfer files over network.

Step 9. Now right click the drives which you want to share and select the share with option. After that select advance sharing option.

Step 10. Now you’ve see the drive properties Window, click on the advance sharing button. You will see the next window with a check box. Tick the checkbox and click on “Ok” Button. You can also change permission to full control, change, and read only.

Finally, Share the folders that you want to transfer files from and that’s all!!!.

You’ve learnt how to transfer data by connecting two laptops using LAN cable on windows operating system. Share this post and drop your comment if this post was helpful to you or if you have any bordering question in mind let us know!.
Thanks.


Friday

How To Automatically Add A Read-More Tag To All Posts On Your Blog

How To Automatically Add A Read-More Tag To All Posts On Your Blog


This topic was actually created based on the request of a fan of this blog, but I’ve decided to publish it to the front page so that everyone can learn from it and also be a beneficiary at large.

Sometimes ago, i talked about how to put a read more attribution link to any text copied from your site , but today we're talking about adding a read more tag to each topic of ur blog post.
As a blogger you might have been seeing so many websites with this jump-break (read-more tag) of a thing and you keep wondering how it was configured or programmed on that particular blog. But whenever you try to understand how it’s been done so that you can do the same thing on your blog; you always don’t just understand or even get confused at times.

When it comes to technology, we at Damytechs blog have it as our utmost priority to make sure that we feed you with a useful, comprehensive and self-explanatory articles.
Today, I’m assuring you that you gonna learn it fully and you’ll be able do it yourself on your blog. So, just sit back and enjoy learning with us the step by step process of automatic adding of read-more tag to all posts on your blog.

Question1: What Is A Read more Tag?
A read more tag is one that summarizes a blog post by displaying the topic and a little part of the post and preceded by a “Read More” tag(link) in its front. When the “read more” link is clicked it will show the full post of that particular topic.

Question2: Why Do I Need It On My Blog?
·       It makes your blog neat and well arranged(users friendly).
·       You will be able to display lots of topics at the front page.
·       It makes your blog load faster.
·       It increases time spent by readers on your blog/site,
·       Finally, it will Increases your page views.

Question3: How Do I Install It On My Blog?
To install it on your blog follow me up from the first step to the last step. Now, lets go…

STEP1: Log on to your Blogger Dashboard click on Theme , then Edit HTML.


STEP2: Click anywhere in the code area and press ctrl+ F ,then search for this tag (Hit enter)
<data:post.body/>


Note: After hitting on enter you will find this code more than once, stop at the third one!

STEP3: Replace the code above with this one:
<b:if cond='data:blog.pageType != &quot;static_page&quot;'> <b:if cond='data:blog.pageType != &quot;item&quot;'> <div expr:id='&quot;summary&quot; + data:post.id'><data:post.body/></div> <script type='text/javascript'>createSummaryAndThumb(&quot;summary<data:post.id/>&quot;,&quot;<data:post.url/>&quot;,&quot;<data:post.title/>&quot;);</script>  <span class='readmore' style='float:right;'><a expr:href='data:post.url'>Read More &#187;</a></span></b:if></b:if> <b:if cond='data:blog.pageType == &quot;item&quot;'><data:post.body/></b:if> <b:if cond='data:blog.pageType == &quot;static_page&quot;'><data:post.body/></b:if>

Note: If you don’t see any changes after going through all the steps, replace the second <data:post.body/> tag as well!.

See this also: Reasons why search engines might have ignore your website.

STEP4: Now, search for the following tag:
</head>
STEP5: Just above the </head> tag, add the following script and css code:

<script type='text/javascript'>
posts_no_thumb_sum = 490;
posts_thumb_sum = 400;
img_thumb_height = 160;
img_thumb_width = 180;
</script>
<script type='text/javascript'>
//<![CDATA[
function removeHtmlTag(strx,chop){
if(strx.indexOf("<")!=-1)
{
var s = strx.split("<");
for(var i=0;i<s.length;i++){
if(s[i].indexOf(">")!=-1){
s[i] = s[i].substring(s[i].indexOf(">")+1,s[i].length);
}
}
strx = s.join("");
}
chop = (chop < strx.length-1) ? chop : strx.length-2;
while(strx.charAt(chop-1)!=' ' && strx.indexOf(' ',chop)!=-1) chop++;
strx = strx.substring(0,chop-1);
return strx+'...';
}
function createSummaryAndThumb(pID, pURL, pTITLE){
var div = document.getElementById(pID);
var imgtag = "";
var img = div.getElementsByTagName("img");
var summ = posts_no_thumb_sum;
if(img.length>=1) {
imgtag = '<span class="posts-thumb" style="float:left; margin-right: 10px;"><a href="'+ pURL +'" title="'+ pTITLE+'"><img src="'+img[0].src+'" width="'+img_thumb_width+'px" height="'+img_thumb_height+'px" /></a></span>';
summ = posts_thumb_sum;
}
var summary = imgtag + '<div>' + removeHtmlTag(div.innerHTML,summ) + '</div>';
div.innerHTML = summary;
}
//]]>
</script>
<b:if cond='data:blog.pageType != &quot;static_page&quot;'>
<b:if cond='data:blog.pageType != &quot;item&quot;'>
<style type='text/css'>
.post-footer {display: none;}
.post {margin-bottom: 10px; border-bottom: 1px dotted #E6E6E6; padding-bottom: 20px;}
 .readmore a {text-decoration: none; }
</style>
</b:if>
</b:if>

Further customization:
*To change the number of characters shown when no thumbnail(image), change the 490 value in blue.
*To change the number of characters shown when there is a thumbnail(image), change the 400 value in blue.
*If you want larger thumbnails change the 160( height) and 180(width) values in red.

STEP6: Click on save theme, then you’re done!.

If this post was useful to you please do not hesitate to drop your comment. Also, if you are not able to do it successfully, we are interested in helping you through so please let us know by using the comment box below!

THANKS FOR VISITING DAMYTECHS BLOG!!!.

Enjoy!

Monday

 Bluetooth And Wi-Fi Not Working: 5 recommended Alternatives To Share Files.

Bluetooth And Wi-Fi Not Working: 5 recommended Alternatives To Share Files.

We all know how easy & fast it is nowadays to share files between a device and the other. The progressive and rapid advancement in technology brought about the existence of so many varieties of mobile devices such as mobile phones, tablets, ipads e.t.c [specifically smart phones].

These smart phones have at least two(2) media for file transfer which are “Bluetooth” and “Wi-Fi direct”, which i believe that most of us prefer using “wi-fi” to Bluetooth. May be due to the speed at which datas are being transferred.

But come to think of this, what of those that had the two media of data transfer disabled on their phone, is there any other method/means such person can use to transfer files from a particular device to another or do you think  that is simply the end for them? Oh No!!!. Remember that where there is a will there must surely be a way, that’s why am writing an article on this topic today so that you can be enlightened & know how to go about it.The end has not yet come  because your Bluetooth and Wi-Fi is not working, there are actually other ways you can get files into your device even without the two medium mentioned above.
Below are some other recommended ways in which files can be transferred:

1)  USB CABLE:  All smartphones have a USB cable that comes with it, when just purchased new, if yours  is no more working again(can’t connect to pc successfully) you will need to go to an  electronic shop and purchased one that works perfectly with your phone.

The functions of a USB cable are:
·         Charging capability:  it charges your device.
·         Phone to pc data connection: connects your device to pc.

After a successful connection to the pc (computer), it will show on the computer as “detected”.So you can simply  scrol to the folder where the file is, and make use of the control copy and paste command[ to copy=> ctrl+C. and to paste=> ctrl+V ]

2)  NFC (Near Field Communication):   This NFC (Near field communication) can only exchange data between two devices with a distance less than 10 cm apart (it might be increased latter) meaning that it  is  a  short ranged communication technology . A device that has NFC-powered ability will be able to exchange data with another NFC enabled device.
The functions of NFC in a device are:

  • Can make digital transactions e.g. bills and credit card/debit card payments at a very high security  protection.
  • Transfer of phone data.   

3)  MEMORY/SD CARD

How to go about it:

  • Cut and paste/Copy and paste your files into your internal phone memory then delete the data on the memory card.
  • Remove the SD  CARD and insert into the device you need a  file from;
  • copy of all what you need and insert it into your own device.

4)  THE INTERNET: With the aid of good internet connections, upgrade in internet network  from  2G  to 3G ,not only that we now have 4G LTE;a super fast internet network connection ,which makes you surf the internet swiftly and smoothly.

You can also make use of the internet as a medium for file transfer . How? ,through the use of some applications namely :

  • Messaging app : such as  whatsApp (a widely used social messaging app, download it HERE) ,  Facebook, email services. Messaging apps can mainly be used for small or light data  transfer.
  • File sharing sites :
     *     Google drive
     **   Dropbox
     *** Zippyshare  etc.
After uploading the files to any of the above file sharing site, you then give out your link so that the person that needs it can download it to the device.
With this method, you can share large file online and easily get it on your device.

5)  The last method i will recommend is “USB Device + OTG” : OTG means “On The GO”. It is a feature that comes with the most Android phones. If it also came with your phone then you can connect a USB device or USB flash drive to the phone using OTG cable.

 So, once connected, all the phones' data can be easily copied to the USB device and there you go!!!!!!!!!!!!

Do you have any other data/ file sharing method you know about?... please let us know via the comment section below.
Thanks for taking your time to learn from Damytechs blog – a place you can’t afford to miss.
Make sure you click on the share buttons  below to show us some love.
Thanks   a   million   times!.

Sunday

Specifications And Price Of Fero A4001 Mobile Phone.

Specifications And Price Of Fero A4001 Mobile Phone.


We are all aware of what’s happening in the country presently: the crash of our dear naira to dollar, given rise to periodical increase in the price of almost all goods in the country, and all these also affects technological gadgets (Mobile phone to be precise).

It’s difficult to find a cheap and quality phone at a price less than 20k(twenty thousand naira) in market this days. Here comes an android mobile cell phone the name of the phone is “Fero A4001” , comes with 6.0 Marshmallow.

See the full specifications and price below:

Operating system

Type: Andriod
Version: Andriod 6.0 Marshmallow

Processor

Chipset: SC7731C
Frequency: 1.2GHz Quad-core

General

Dimensions: 125.2*63.3*10mm
Weight: 110g
Colour: Black, silver, cyan
SIM: Dual
SIM type: Micro
Display: IPS LCD capacitive touch screen of 16million colors and 4.0inches full HD display screen with 480 x 800 pixels and also supports multitouch.
Memory
RAM: 512
ROM(internal): 8GB
External memory: Micro-SD, extendable to 32GB
Back/Front Camera : 2.0MP/0.3
Network/connectivity: 2G, 3G
Battery: Removable Li-ion 3000mAH battery
Current Price: 29,000 (Konga),


So, guys, what do you have to say about this??
Oyaaa drop ya commentssss now!!!!!

Thursday

How To Repair The Mouth-Piece Of Your Phone- Do It Yourself

How To Repair The Mouth-Piece Of Your Phone- Do It Yourself

In today’s discussion am gonna teach you how you can make your mobile phone that had a faulty or damaged mouth-piece to work again and perfectly without visiting any engineer's shop.

WHAT IS A MOUTH-PIECE ?

A Mouthpiece is a component that converts sound signal into an electrical signal, it then transfers it through your network to your caller and also makes you to hear whatever you've recorded.


Everyone of us uses a mobile phone that’s why u’re able to read this very article. Its commonly reported that some phones do have mouth-piece problem after few weeks or months of purchase. I will advise here that you should not just jump on any phone that you see in market, take your time to checkout on the quality of the product/model you want to buy.

You don’t need to be an engineer before u can perform some little exercise on your phone because you’ve visited the right website where you can get practical tutorials full and free...


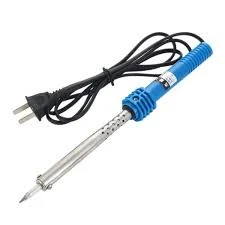
There are some instruments(tools) we are going to use in the cause of this training so you need to buy them so that you will not always borrow from people, when you have yours you can easily lay hold on it whenever you need it for your phone ,electrical gadgets or loved ones. To get these tools visit any electrical shop ,ask for solding iron, solding lead and engineering tools.

SEE THE PICS OF WHAT YOU NEED BELOW…
phone repair tools and screw drivers
phone repair tools
Electrical soldering iron
soldering iron


Soldering lead
soldering lead

NB: If your callers “always” complain that they don’t hear you clearly/at all ,its also a mouth-piece disorder.
Follow me carefully as I solve the problem now. Just two steps 


STEP 1 : LOCATE YOUR MOUTH-PIECE

From what I said earlier you should now understand what a mouth-piece is, good!
After you’ve bought the complete tools' pack ,pick an engineering tool that have an exact match with the “nut” of the phone you want to loose. OK!, » now loose it and carefully bring out the panel of the phone out of the body (craker).
Note: Don’t force it out of the “craker” so as to avoid the damage of any resistor or any other unit.

 STEP 2 : DO IT YOURSELF
Goto the lower part of the phone, you will see the mouth piece there.Here ,u’ll either see a tiny wire on the mouth-piece disconnected or everything well connected but mouth-piece damaged, so any of the two cases u notice ,just replace with the new one you bought and solder it back then you are done!!!

TO TEST: Goto your phone menu and click or tap on record, » record anything » save what you’ve recorded and hear it working CLEARLY and LOUDDD…… Hurray you are now an engineer!!!!!!


Keep visiting us for more tutorials like this and subscribe to our latest update via Email below.

If you have any question please feel free to drop it in the comment box below I will respond as soon as possible.
Have a great day!.


Wednesday

How To Know/Check Your Current Tariff Plan-All Networks

How To Know/Check Your Current Tariff Plan-All Networks


Hello guys how are you doing , i believe you are all fine.......dahts great!!

Am sure that very few of us know the tariff plan in which we belong on our respective network services.


Why do you need to Know It?

You need to know your tariff plan so as to know which one will favor you most in terms of their call rates, data bundles/plan, promo and other enjoyable services. For example, on my own personal glo line; whenever i recharge am always given free credit(for both inter and intra-network calls), data bundle and so on. So , if you don’t know your package then you’ll be suffering silently cuz you don’t which of the plan will be most favorable to u.

Many persons always complain to me that whenever they recharge and start making calls ;their credit always run-off very fast.
It’s unfortunate that most/all service providers do place the subscribers on expensive tariff plan so as to maximize profit, but since you are innocent about it you just see that your credit is not always enough for you.
Do you know that you can actually talk for hours with little credit?, this can be so when you are on an affordable call tariff plan/package.

Dial the codes below as stated on their respective networks.

For Airtel: dial *121*2*1#
For Glo: dial #100#
-you may get a response like USSDC:ESME, keep dialing the code until it display ur tariff plan.
For Mtn: dial *123*1*2#
For Etisalat: dial *244*33#
After knowing your tariff plan and you wish to know the benefits of the plan or you wish to change to another plan, you can call the care center with this numbers.

Customer lines:
For Airtel: dial 111 or 121 (both working)
For Glo: dial 121
For Etisalat: dial 200
For Mtn: 180.


Don’t forget to click the share buttons and also drop your comments. Thanks.

Monday

Major Reasons Why Search Engines Might Have Been Ignoring Your Website

Major Reasons Why Search Engines Might Have Been Ignoring Your Website


There have been so many complains here and there especially from those that are newbie to blogging saying that Google and other search engines are not indexing their entire website though they submitted it week ago and so on... This is very true but i want you to know that nothing actually happens without a cause or reason.
You may be experiencing this due to all or some of the following reasons i have shortlisted below, checkout the one you are guilty of and make necessary corrections or changes.
They are listed as follows:


(1) Inability for search engines to read your web page content: 

Know this,that search engines do make use software programs to get your website/web pages indexed. A web page that looks so great to the eye can be totally “meaningless” to search engines, and may completely ignored.If you have a good looking web site that is “meaningless” to search engines, you will not be able to obtain high search engine rankings with that web site no matter how cool and interesting your web site content maybe. In general, search engines cannot detect your content which is presented in images (PNG, JPEG, GIF e.t.c.), Flash elements, JavaScript and other script languages or any other multimedia file formats.So now you need find out how search engines see your web page, use a search engine spider simulator. The free IBP trial has a fully functional spider simulator that gives you an opportunity to see your web pages through the eyes of a search engine.

(2) Check for “Noindex” in the Meta settings:If you add NOINDEX in your meta tag settings it means you do not want bots to indexed your website at all.

So, make sure they are not included in the tag and if included then remove it.


(3) Your web pages may contain spam elements:
If your site contains a unit of spam element it is capable of destroying all your SEO work. If you make use “hidden text” or other spam elements on your web page then many search engines will not list your web site, no matter how great its content might be.
If you use white text on a white background, text in invisible CSS elements or similar elements that might be interpreted as spam then you should remove these elements as soon as possible. It will be difficult to get high rankings if your web pages contain spam elements.

Only Submitting your web site to search engines is not just enough. If you want to get high rankings you must make sure that search engine spiders can access your web pages without problems.

Finally, make sure that search engine spiders finds out the right content on your web pages and your site must have enough inbound links.

Note: use the IBP program to help make your website more prominent on the search engines.

(4) Site de-indexation:

This literally means that search engines stop to index your website and even delete the ones that have been indexed afore time. This problem may be as a result of your website accommodating so many spam contents, regular changing of your url, publishing of fake articles and that are irrelevant.

(5) Copy/paste or contents:

I believe we all know what this means, you continue posting others person’s articles directly without acknowledging the real owner, and you expect your website to be indexed how will that work, i can assure you that if you continue that way your website will later get banned and you will loose your website and your work will turn to a waist.

If more than a URL on the same website are linking to multiple pages with the same contents then you may likely have a duplicate content issue affecting your site
So make sure all your contents are original or unique.
Find and delete all duplicates on your web site then you will see the changes on how search engines will start indexing your site.

Do well to click the share botton below and also i love to see your comments.


Thanks!
Prolong Your Laptop's battery Life With These Simple Tricks - Check It Out

Prolong Your Laptop's battery Life With These Simple Tricks - Check It Out


Do you often wonder why your laptop battery drain quickly. This could be due to the way you use some of your laptop functions. I am going to be showing you some tricks that would help you save more battery life. None of these tricks will turn a laptop without much stamina into an all-day workhorse, but they’ll help you go without an outlet for a while longer. Extra attention should be paid to the laptop's display— that’s the big battery sucker.

(1) Reduce The Screen Brightness :

The biggest battery drain on any modern portable electronic device — whether it’s a laptop, smartphone, or tablet — is the display. Reducing your screen’s brightness is a simple way to significantly save more time from your laptop’s battery. On a typical laptop, you generally hold the Function ess the brightness buttons on your laptop keyboard. The lower the brightness level, the longer you can use your laptop on battery power. This applies to any laptop brand. You can also use the Windows Mobility Center to quickly adjust screen brightness. Open it by pressing Windows Key + X on Windows 7. On Windows 8, you can launch it from the Control Panel — Windows Key + X opens the power user menu instead.

(2) Have Your Display Automatically Turn Off :

If you step away from your laptop for a few minutes, or stopped using it for sometime, its screen will still be on, draining the battery power. This can be reduced by setting more aggressive display power settings to have the laptop dim and turn off the display when you’re not using it. To do this, open the Power Options dialog in the Control Panel and set your display to dim and turn off after a short period of time. You can move your mouse or press any key to turn the display right back on with no delay, so this is an easy way to save power — as long as the display doesn’t turn off while you’re using the laptop, this shouldn’t bother you too much. Media players set the display to automatically stay on while they’re running,this ensures that you can still watch a video without constantly having to move your mouse or change your power settings.

(3)  Disable Bluetooth and Other Hardware Devices :

Its possible that your laptop has a Bluetooth radio and may even have an infrared (IR) port. All of these devices drain battery power simply by being enabled and powered on. You can save battery power by disabling them when you have no use for them. To disable Bluetooth, you can easily press the Function (Fn) key and press the key with the Bluetooth symbol on your laptop. Disabling Wi-Fi can also help in saving or increasing your battery life if you aren’t using it. For example, if you’re using your laptop on an airplane and not taking advantage of in-flight Wi-Fi, turn off your laptop’s Wi-Fi to save some power. Wi-Fi can be turned off in a similar way using the function keys on your laptop or even by disabling the Wi-Fi adapter in the Control Panel’s network connections window.

(4) Tweak Your Power Plan :

Windows offers power plans that can quickly change your laptop’s power settings to different profiles. For example, you can have your computer in Balanced mode most of the time and switch to Power saver mode when you need every bit of power you can get. Each power plan’s settings can be modified individually. You’ll find power plans in the Control Panel’s Power Options window. To modify advanced power options, click the Change plan settings link and select Change advanced power settings. You can change a variety of settings here, including setting your laptop to power off its hard drive more quickly and telling your computer to slow down the processor rather than turning on the fan if it becomes hot. Both of these behaviors will save power. The default settings should be fairly optimal if you select Power saver mode, but you can make the settings even more aggressive in some areas.

(5) Use the Windows Power Troubleshooter :

Windows 7 and 8 include a power troubleshooting tool that will scan your system for common battery drains and automatically fix them. To load this tool, open the Troubleshooting pane in the Control Panel — perform a search for Troubleshooting to find it. Select the View All option in the Troubleshooting pane and launch the Power troubleshooter. Windows will look for common issues and automatically fix them. This is a quick way to check if a laptop’s settings are optimal without digging through many different options dialogs.

(6) Slim Down Startup Programs, Use Lighter Software :

To save power, make your computer do less in general: Don’t use a screensaver. They’re unnecessary on modern displays and will drain your battery to do nothing useful when your display could be off and saving power. Run fewer programs in the background. Examine your system tray for programs you don’t need and uninstall them or disable them and prevent them from automatically starting with your computer. Reduce CPU usage. If you use heavy programs that have your CPU doing a lot of work all of the time, your CPU will use more power and your battery will drain faster. Running fewer programs in the background can help with this, as can selecting lightweight programs that are easy on system resources. Avoid maxing out your RAM. If your computer fills its RAM and needs more memory, it will move data to the page file on its hard drive, and this extra hard drive usage can drain battery. This shouldn’t be a problem on modern computers with a decent amount of RAM. If your laptop’s RAM is full, try to make more RAM available — close programs running in the background or even upgrade your laptop’s RAM. The less your computer has to do, the more power it can save. You can find more information about CPU and RAM usage in your Task Manager.

(7) Hibernate Instead of Sleep :

When your laptop goes to sleep, it uses a small amount of power to power its RAM and keep its system state loaded in memory, allowing it to wake up and resume in just a few seconds. When your laptop hibernates, it saves its system state to disk and powers off, using almost no power. If you’re not going to be using your laptop for a few hours, place it into hibernate mode rather than sleep mode to conserve even more battery power. Sleep mode doesn’t use a lot of battery power, but hibernate uses as much as having the computer powered off.

If you’ve had your laptop for a while and the battery is holding less power than it used to — but you’re not ready to upgrade to a new laptop just yet — you can try replacing your laptop’s battery with a new one for even longer battery life.

Leave your comment before you logout.Thanks!!.

Thursday

Tips On How To Guest Post And How To Benefit From It

Tips On How To Guest Post And How To Benefit From It


Question: What is the meaning of guest posting?
Answer: From the word "guest" -meaning a visitor, so, guest posting simply means the act of creating and publishing relevant contents on another person's website.
Blogs are a very popular platform for guest posting. It's a good way to build an online reputation and for a company very famous. Not only will a company’s followers see its content when u post to another person's blog, but also anyone who follows the host blogger will see the company’s content as well, thus reaching an audience that might be unaware of your service or brand.

Importances Of Guest Posting

From what i just explained above , you should have now begin to draw out of what importance guest posting will be to you as a blogger.

Below are the listed importances:

  • πŸ‘‰When you guest post, it makes you to have a wide range of access to new audiences by increasing the amount of people advertising the content.
  • πŸ‘‰It builds your online authority when you have contents posted on other sites.
  • πŸ‘‰It also establish a positive relationship with other companies and people that may be of help to us in terms of purchasing your products or request for your services.
  • πŸ‘‰You will be easily seen on search engines thereby increasing your traffic and page rank.
Now that you've known what a guest post is and its importance, at this junction i want you to also know that there are some criteria to meet up with for your post to be accepted and you benefiting from it.

Things that you must consider before you write any guest postπŸ’–:


1. Analyze your area of interest:
This is one of the things that most writers fail to consider! Obviously everyone has expertise in specific domains. Choosing a topic on the field you are knowledgeable in will give an added advantage over other writers, and your content could easily attract numerous audience.

2. Be creative and new:
No website will accept copied content so, you write a fresh and new content that will hunt the interest of people. Don't worry if your article is of low quality you will be better as you continue to write.

3. Adhere to Their rules
Always read the rule and regulations of the site you wanna post to and make sure you abide by them so that your article will be accepted and published.

4. Keep it clean:
Try to make your work very simple and easy for people to be able to read and understand. Avoid using too much grammars and vocabularies.

5. Follow your readers:
After your written article have been accepted, make sure you respond to peoples comments as it will encourage them and build trust and relationship between you and the audience.

For your information, here at damytechs blog guest posting is allowed!.

I believe you have learnt so much, so it's now your turn to show us loveπŸ’— by clicking our share bottons below then drop your cemments. THANKS!!!!!!!πŸ˜„πŸ˜„πŸ˜„πŸ˜„
You Too Can  Be A Winner – @ZealmatAward2017

You Too Can Be A Winner – @ZealmatAward2017


Hello, my readers how have been your day so far, i belive you’ve been flexing it so well, ok good!.
It’s been long i posted here on this blog due to some reason’s which made me so busy, but now am back to feed yes! I mean “to feed” you with the juicy articles that you always love to read here on Damytechs blog.

I was surfing through the net today , then visit one of my favorite blog “ Zealmat blog ”. There, i saw a package, so i decide to share it with the dedicated readers of this blog.
What can this be ?....try guessing …. Oh! No, you can’t get it right. What exactly am bringing to your notice is known as “ZealmatAward2017”.
Zealmat Tech Blog
Zealmat blog is an outstanding tech blog in Nigeria that’s setup to give valuable & understanding tutorials to your knownledge. 

ZealmatAward – is a yearly prize-giving award brought to you by Zealmat blog( www.zealmat.com).
You can view the winner of this year’s award here.
So, for you as a blogger to be qualified for the next year’s award, there are some tasks you are expected to carry-out. See the criteria here.

After a successful completion of the task then see what you stand to enjoy below:  

*You will receive a certificate and cash of ₦3,000 or a domain  name. Then, 
*You will be giving the opportunity to advertise your blog/site for free. Also,
*You will have an access to a free website banner or logo designed for you and lots more…..

Wow this is so amazing, cant wait to be a winner..lolz. What are you still waiting for. Get started now.

Note: this offer is for a limited time and it will last till the 10th of Jan. 2017.
This might be your chance.

#TAKE CHARGE OF YOUR OPPORTUNITY NOW!!!
If you still wish to make further enquiries then click here.

Make sure you comment and subscribe to our daily update so that you can receive updates on other awards and scholarship programs. 

   Thanks for reading this article!