Monday

Unlock Pattern Lock On Android Phone - Do It Yourself

Unlock Pattern Lock On Android Phone - Do It Yourself

Gone are those days when you forget your lock pattern of your android smartphone and the next thing to do is just to rush down to an engineer’s office or shop to flash (reset or unlock) it.
Android smartphones are famous worldwide for having various kind of useful applications and games. Since we download apps that we need like we use messengers, photo editors, calling apps, launchers and other security apps.
Normally we use pattern lock to protect phone for others or we even use some applications. It is a very easy and simple way to secure our personal mobile phone data with pattern lock. We have to just draw a pattern and that’s it. As we don’t have to bother about putting numbers or characters for password. Because we can easily forget numbers and characters as compare to pattern lock, it is a very rare case that you may forget your pattern lock.
Though we usually make use of the playstore by sign-in to our Gmail account to reset our phone, but incase u don’t have an account linked to the playstore don’t worry, i am here with three different tricks you can make use of which at least one of the method must work for you to unlock pattern lock!.

First Method: Unlock Pattern Lock On Android Without Losing Data.

This method will also help you to reset your password.
Items needed are:


➽ Aroma File Manager  download it HERE

➽ A memory card for android device.
You android device either locked by pattern lock or password lock.
Step 1.

  • Download Aroma File Manager.
  • Place it in your memory card (SD card) and insert the memory card into your locked android smart phone.
Step 2.


  • Open Stock Recovery Mode with reboot your android device and pressing Power Key and Volume up key simultaneously. Different phones may have different methods to open stock recovery mode so if you face any problem Google search it.
Step 3. 

  • After entering into recovery mode use Volume+ and Volume- buttons to scroll up and down. For select use middle button.
Step 4.

  • From there click on “Install Zip from SD Card” and give path to install “Aroma File Manager” from SD card.
Step 5.

  • When it’s through with the installation, it will open in recovery mode.
Step 6.


  • From the Aroma File Manager navigate to settings.
  • Go to bottom and click on “Automount all devices on start” and then exit.
Step 7.

  • Now again click on “Install Zip from SD Card” and give path to install “Aroma File Manager” from SD card.
Step 8.


  • After this you will get “Aroma File Manager” opened again.
Step 9.

  • Now navigate to “Data Folder”,then System Folder and find  “gesture.key” or “password.key” for pattern lock or password lock respectively.
Step 10.

  • Delete that any one file and then exit aroma file manager and reboot your android device.


  • After rebooting you will notice that password or pattern lock is not removed. But don’t worry draw any pattern and you will open your android device but remember or note that pattern because it will be saved.

Second Method: Unlock Android Pattern Lock With SDK Tools.


1. First of all Download Android SDK and here we will show you How To download and install Android SDK Tools.Android sdk tools interface
·       Download and install Android SDK Tools for run ADB commands. Open the given page and then select platform according to you download and install it.
·        After installing open it, unchecked the other packages and check Android SDK Platform-tools and then click on install packages according to the image given below.
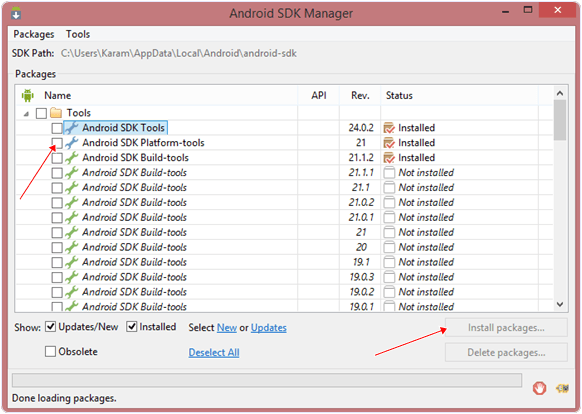
Android sdk tools manage


2. So the other requirement is USB Debugging should be enabled before your android device was locked.
3. The process will probably not be helpful if you don’t have specific and compatible drivers for your phone. So you should be very careful While installing your device compatible drivers.
Steps To Unlock Android Pattern Lock.
Step 1. Connect your locked android phone with PC/Laptop via USB.

Step 2. Then, Open folder where you installed Android SDK Tools Users, navigate to the following >> App Data >> Local >> Android >> Android-SDK >> Platform-Tools and then click on blank space hold shift and click right mouse button and select “open command window here”.
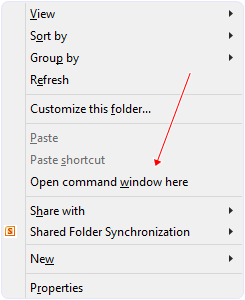


open command window setting

Step 3. It will open you command window. Then, you have to put some commands in the command window:-
For checking your device is connected or not put command:-

adb devices
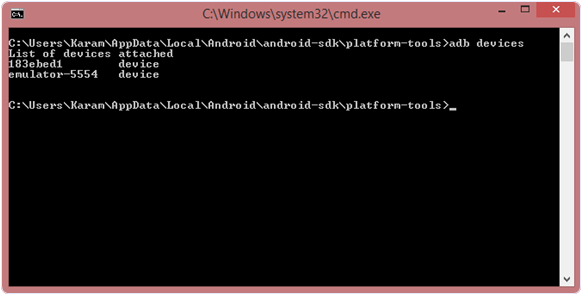

 Android sdk cmd settings to unlock pattern
Then, put these commands:-

adb shellcd /data/data/com.android.providers.settings/databasessqlite3 settings.dbupdate system set value=0 where name=’lock_pattern_autolock’;update system set value=0 where name=’lockscreen.lockedoutpermanently’;.quit
If above commands not working put:-
adb shell rm /data/system/gesture.key
Step 4. Once you done the above steps, you have to reboot your android device. Now its all done.
After rebooting your device you will see the pattern lock disabled.
So in this method USB Debugging should be enabled before lock because it is a must. If it is not enabled then you cannot proceed further steps.


Third Method 3rd: Unlock Pattern With Factory Settings (Data Will Lost).

Since, in the above methods we have used PC/Laptop, we downloaded software and we usedsome commands. But if you do not have a PC/Laptop or your device did not have USB Debugging enable, then you can follow this method.
Note:- In this method your all data will be lost. So if you do not want to lose your data then don’t  follow this method.

Step 1. First of all, Switch off your Locked Android Device.

Step 2. Then, boot your Android device into “Recovery Mode” using specific keys by holding power key and volume up key simultaneously.


Step 3. After opening Recovery Mode

       Select “Factory Data Reset” option              and give “Yes“.
    ➠ Select “Wipe Cache Partition” to           wipe cache data.

Step 4. Reboot your device.

Step 5. All Done ! hence, your device will start from the scratch.
You’ve learnt how you can unlock pattern lock on your android smart phone, do your best to share it out to other that might need this same trick and if you have any question let us know, don’t logout from damytechs blog without droping a comment.
Thanks for reading!!!.


Friday

How to Bypass Surveys To Download Or Unlock Files

How to Bypass Surveys To Download Or Unlock Files


Sometimes, you want to download a very important app, after a very long while of searching for the app on getting to the download page it displays something like “complete this survey to download ” . Online surveys are a method for web sites to earn money. Haven’t you noticed that it is rare when you locate a thing you need even after completing the survey?
Online Surveys can include reddit and mouth watering offers for a latest Smartphone, Coupons worth numerous for a MNC’s, etc .
They ask you to enter your personal details enjoy E-mail, Phone no ., etc and what you receive their is Fakes.
 You know how annoying this is because if you don’t complete the survey you won’t be able to get the file you wanna download, the most annoying thing about surveys is that most of them demands you to pay for one thing or the other which sometimes you might even end up not getting the file you want to download . Now, i’ve found a solution to this kind of annoying/disturbing online surveys.
There are so many methods you can actually use, but i will be showing you guys the best of the methods that in no doubt will work out for you, just follow through the four methods I‘ve gotten for you, precept by precept.

*First Method:  Using a Survey Removal Bookmarklet.


In this first method of getting rid of disturbing surveys you will Install the XJZ Survey Remover bookmarklet. This is a bookmarkable link that you may place in your bookmark bar. When you visit a site with a review, you can click the bookmark to attempt to remove the survey. Follow the steps listed below to try this method.
ü Find XJZ bookmarklet on the developer’s website. Its available for free. You can open the website by clicking here.
ü When you have opened typically the developer’s website, click on star on right side of street address bar in most of the browsers to bring and save the link towards your Bookmark Bar.
ü Whenever you visit a website with an Online survey, click on XJZ Survey Remover bookmark which you have saved earlier. Now you will see that internet site will reorganize, and will show you the content for which you came to that internet site.
I want you to know that this method will only work if the website really had written content. This method will not help you if that website is not having any written content and was just aiming to waste your time.
It also would not allow you to if Online Survey is compulsory to be completed if you want to reach the specified content.
ü You can also install XJZ Survey Remover extension or possibly ad-on your browser to help you Bypass an online survey.
*Second Method: Use Fake Information To Bypass Surveys To Unlock Content.
This is another method that will help you to Bypass an Online Online survey if the first method cant complete the task. Using this method you do have to pass through the Online Survey, but you would not really have to enter your personal details.

This method is useful if it is compulsory to complete press announcements Survey. 
Follow the following steps to help you to Bypass an Online Survey:
1. In the first place find an Fake information generator, which you can easily find by Googling.
It will generate fake Name, Gender, Address, Phone no ., Position and many more details that an online survey needs to be filled.
2. Gather all the information from this website and fill it where the Online survey demands.
3. You can establish an E-mail from any website that offers free E-mail service plan.
Fill all the information in Online survey and you are great to go.
Note:This method will still not work if that particular blog does not have any content in it.
*Third Method: Bypass Research studies Using Browser Extensions.

Now-a-days browsers are equipped with much more stuff after this you need. But it comes to help in situation like this.
To Bypass an online Survey to Download Files you can now add add-ons or extensions in your browser.
Add-Ons for Mozilla Firefox users to Bypass Studies.
Mozilla Firefox users download add-ons to help you bypass online surveys.
Note:  This method may not work for all websites mainly because it depends on website.

*The Last Method (4):  Bypass Online Surveys By Turning off JavaScript.
Yes! Surveys can be unlocked easily by disabling JavaScript of your browser. You can easily disable JavaScript by going into your visitor setting.

How To Disable JavaScript In Firefox.
ü  Open your Firefox browser.
ü  In the address bar, type about: config and hit enter.
ü  Click on “I’ll be careful, I promise! ” on the up coming dialogue that comes up.

ü  Find the preference referred to as javascript. enabled. To easily find the option, type the word “javascript” from the search bar.
ü  Right-click on “javascript”. enabled and select “Toggle. ” The status should change to “user set” and the preference need to become emboldened. 

ü  Close the about: config tab.
ü  After bypassing reactivate JavaScript for smooth browsing.
ü  Click on Show advanced settings”.
ü  Simply click “Setting option.

ü  Open Google Chrome web browser. 
ü  Simply click “Content settings”.

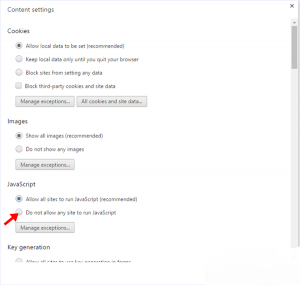
ü  Click on “Do not allow any site to use JavaScript”. After bypassing reactivate JavaScript again for simple browsing on other websites.

I believe this post was beneficial to you, if that was so, drop your comments and lets know your opinion/feedback and if you have any question to ask feel free cause we’re ready to answer you asap. I want to go and sleep ohhhh……
Thanks for visiting Damytechs blog.

Thursday

How To Connect Two Laptops Using LAN Cable In Windows

How To Connect Two Laptops Using LAN Cable In Windows


The full meaning of LAN is "Local Area Network".
As a result of the rapid rate of technological upgrade; the use of computers and Laptops for our daily activities has largely increased. Recently the use of Laptop has increased because Laptops are portable and compact and provide many facilities and opportunities just in a single unit. Laptops are useful for office works as well as home activities. With the help of Laptops we can do our work where ever we like.

 It’s nowadays common that laptops has storage space of 500 GB or 1 TB .
Most a times, we use pendrive to transfer files/data from one device to another, just like we want to transfer whole data from one laptop to another.

So, to transfer data at higher speed  we can use a crossover LAN cable with RJ-45 connector to connect two laptops. It can transfer data with more than 200 MB per second. Even we recommend to use cloud storage services so we can easily access common data from any device.

Now, am going to explain to you how you can easily connect two laptops using LAN cable. Just in ten steps, there we go!!!.

Step 1. Connect the both laptops using crossover LAN cable with RJ-45 connector; simply by connecting one end of the cable to the first computer and the other end to the second computer.

Step 2. open the control panel and choose network and sharing center.

Step 3. Click on  “change adapter setting” option. After clicking the change adapter setting you will see a pop-up window.

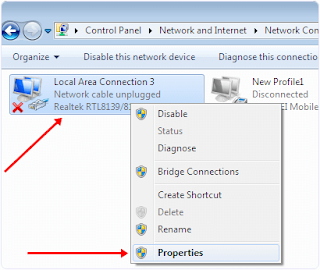
Step 4. You will see  Lan adapters(on the pop-up page). Right click on “properly installed adapter” then, select its “properties”.
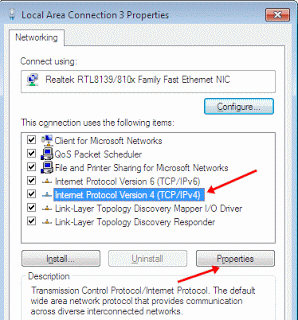
Step 5. In the properties sub-menu click on the “Internet protocol version 4”, then click on the “properties” button.

Step 6. Now enter IP addresses in both the laptops accordingly as given below:

Settings In First Computer Or Laptop:
IP address: 192.168.0.1
Subnet mask: 255.255.255.0
Settings In Second computer Or Laptop:
IP address: 192.168.0.2
Subnet mask: 255.255.255.0 

Step 7. After Entering IP addresses restart your laptops and open the Network tab by entering network in the Windows Start menu.

Step 8. In Network tab you will see the list of all connected computer to the same network. After computers are successfully connected now you have to share drives to transfer files over network.

Step 9. Now right click the drives which you want to share and select the share with option. After that select advance sharing option.

Step 10. Now you’ve see the drive properties Window, click on the advance sharing button. You will see the next window with a check box. Tick the checkbox and click on “Ok” Button. You can also change permission to full control, change, and read only.

Finally, Share the folders that you want to transfer files from and that’s all!!!.

You’ve learnt how to transfer data by connecting two laptops using LAN cable on windows operating system. Share this post and drop your comment if this post was helpful to you or if you have any bordering question in mind let us know!.
Thanks.


Friday

How To Automatically Add A Read-More Tag To All Posts On Your Blog

How To Automatically Add A Read-More Tag To All Posts On Your Blog


This topic was actually created based on the request of a fan of this blog, but I’ve decided to publish it to the front page so that everyone can learn from it and also be a beneficiary at large.

Sometimes ago, i talked about how to put a read more attribution link to any text copied from your site , but today we're talking about adding a read more tag to each topic of ur blog post.
As a blogger you might have been seeing so many websites with this jump-break (read-more tag) of a thing and you keep wondering how it was configured or programmed on that particular blog. But whenever you try to understand how it’s been done so that you can do the same thing on your blog; you always don’t just understand or even get confused at times.

When it comes to technology, we at Damytechs blog have it as our utmost priority to make sure that we feed you with a useful, comprehensive and self-explanatory articles.
Today, I’m assuring you that you gonna learn it fully and you’ll be able do it yourself on your blog. So, just sit back and enjoy learning with us the step by step process of automatic adding of read-more tag to all posts on your blog.

Question1: What Is A Read more Tag?
A read more tag is one that summarizes a blog post by displaying the topic and a little part of the post and preceded by a “Read More” tag(link) in its front. When the “read more” link is clicked it will show the full post of that particular topic.

Question2: Why Do I Need It On My Blog?
·       It makes your blog neat and well arranged(users friendly).
·       You will be able to display lots of topics at the front page.
·       It makes your blog load faster.
·       It increases time spent by readers on your blog/site,
·       Finally, it will Increases your page views.

Question3: How Do I Install It On My Blog?
To install it on your blog follow me up from the first step to the last step. Now, lets go…

STEP1: Log on to your Blogger Dashboard click on Theme , then Edit HTML.


STEP2: Click anywhere in the code area and press ctrl+ F ,then search for this tag (Hit enter)
<data:post.body/>


Note: After hitting on enter you will find this code more than once, stop at the third one!

STEP3: Replace the code above with this one:
<b:if cond='data:blog.pageType != &quot;static_page&quot;'> <b:if cond='data:blog.pageType != &quot;item&quot;'> <div expr:id='&quot;summary&quot; + data:post.id'><data:post.body/></div> <script type='text/javascript'>createSummaryAndThumb(&quot;summary<data:post.id/>&quot;,&quot;<data:post.url/>&quot;,&quot;<data:post.title/>&quot;);</script>  <span class='readmore' style='float:right;'><a expr:href='data:post.url'>Read More &#187;</a></span></b:if></b:if> <b:if cond='data:blog.pageType == &quot;item&quot;'><data:post.body/></b:if> <b:if cond='data:blog.pageType == &quot;static_page&quot;'><data:post.body/></b:if>

Note: If you don’t see any changes after going through all the steps, replace the second <data:post.body/> tag as well!.

See this also: Reasons why search engines might have ignore your website.

STEP4: Now, search for the following tag:
</head>
STEP5: Just above the </head> tag, add the following script and css code:

<script type='text/javascript'>
posts_no_thumb_sum = 490;
posts_thumb_sum = 400;
img_thumb_height = 160;
img_thumb_width = 180;
</script>
<script type='text/javascript'>
//<![CDATA[
function removeHtmlTag(strx,chop){
if(strx.indexOf("<")!=-1)
{
var s = strx.split("<");
for(var i=0;i<s.length;i++){
if(s[i].indexOf(">")!=-1){
s[i] = s[i].substring(s[i].indexOf(">")+1,s[i].length);
}
}
strx = s.join("");
}
chop = (chop < strx.length-1) ? chop : strx.length-2;
while(strx.charAt(chop-1)!=' ' && strx.indexOf(' ',chop)!=-1) chop++;
strx = strx.substring(0,chop-1);
return strx+'...';
}
function createSummaryAndThumb(pID, pURL, pTITLE){
var div = document.getElementById(pID);
var imgtag = "";
var img = div.getElementsByTagName("img");
var summ = posts_no_thumb_sum;
if(img.length>=1) {
imgtag = '<span class="posts-thumb" style="float:left; margin-right: 10px;"><a href="'+ pURL +'" title="'+ pTITLE+'"><img src="'+img[0].src+'" width="'+img_thumb_width+'px" height="'+img_thumb_height+'px" /></a></span>';
summ = posts_thumb_sum;
}
var summary = imgtag + '<div>' + removeHtmlTag(div.innerHTML,summ) + '</div>';
div.innerHTML = summary;
}
//]]>
</script>
<b:if cond='data:blog.pageType != &quot;static_page&quot;'>
<b:if cond='data:blog.pageType != &quot;item&quot;'>
<style type='text/css'>
.post-footer {display: none;}
.post {margin-bottom: 10px; border-bottom: 1px dotted #E6E6E6; padding-bottom: 20px;}
 .readmore a {text-decoration: none; }
</style>
</b:if>
</b:if>

Further customization:
*To change the number of characters shown when no thumbnail(image), change the 490 value in blue.
*To change the number of characters shown when there is a thumbnail(image), change the 400 value in blue.
*If you want larger thumbnails change the 160( height) and 180(width) values in red.

STEP6: Click on save theme, then you’re done!.

If this post was useful to you please do not hesitate to drop your comment. Also, if you are not able to do it successfully, we are interested in helping you through so please let us know by using the comment box below!

THANKS FOR VISITING DAMYTECHS BLOG!!!.

Enjoy!